One of the most fundamental concepts in 3D computer games
graphics is lighting. Without lighting, models don’t even tend to look 3D, as
you can see in the screen shot below:

The above shading technique applied to a low poly sphere
adequately draws the model shape but due to the fact there is no lighting
whatsoever it looks more like a red 2D sprite.
So let’s cast some light on this... ok no more stupid puns
:P
The three main lighting terms are:
Ambient Light: The general illumination of the area the
model is in.
Diffuse Light: The direct illumination of an area of the
surface of the model that’s facing the light source.
Specular Light: The illumination highlight present if the
angle of the model surface to the eye is just right.
Following on from tutorial 1, where we had a basic new
effect file created inside an XNA environment, we first need to add some more
variables in addition to the ones we have. I will list everything below to save
you flicking backwards and forwards.
1) Gobal Variables
struct PointLight
{
float3
position;
float4
ambientColour;
float4
diffuseColour;
float4
specularColour;
float
ambientIntensity;
float
diffuseIntensity;
float
specularIntensity;
};
float4x4 World;
float4x4 View;
float4x4 Projection;
PointLight Light;
float3 EyePosition;
As you can see we’re declaring a custom struct to represent
a point light. Running through the variables quickly we have the light’s
position in our game world, the three lighting type colours (should you wish to
mix and match for different looks) and separate intensities for each colour so
you can change lighting levels from within the game, for example to create day
and night cycles etc.
In addition to the world view and projection matrices we saw
last time we now have a Light object using the above struct (note the struct
must be declared above because of how the file is compiled) and a world
position for our eye position, this vector would be your camera’s position in
game.
2) Shader Function Input & Output Structs
struct VertexShaderInput
{
float4 Position : POSITION0;
float3 Normal : NORMAL0;
};
struct VertexShaderOutput
{
float4 Position : POSITION0;
float3 Normal : TEXCOORD0;
float4 LightDir : TEXCOORD1;
float3 ViewDir : TEXCOORD2;
};
Again we have our vertex shader function input and output
structs, featuring some extra parameters.
In the input struct we have added a float3 Normal vector, a
normal vector is simply this vertex’s facing direction vector, for example if
this were a flat plane on the X & Z axis, all the normals would be pointing
up on the Y axis.
Similarly we are passing the normal vector back out in the
vertex shader output struct, along with a light direction vector and a view
direction vector.
3) Vertex & Pixel Shader functions
VertexShaderOutput
VertexShaderFunction(VertexShaderInput input)
{
VertexShaderOutput output;
//Multiply position by world, view and
projection matrices
float4 worldPosition = mul(input.Position,
World);
float4 viewPosition = mul(worldPosition,
View);
output.Position = mul(viewPosition,
Projection);
//Calculate world space normal from model
space normal
output.Normal =
mul(normalize(input.Normal), World);
//Calculate un-normalized light direction
output.LightDir = -(float4(Light.position,
1.0f) - worldPosition);
//Calculate un-normalized view direction
output.ViewDir = float4(EyePosition, 1.0f)
- worldPosition;
return output;
}
As with tutorial 1’s vertex shader function we calculate the
projection space position of the vertex by multiplying the incoming position
from the input struct with the world, view and projection matrices.
We are also calculating un-normalized vectors for the
outgoing normal, light direction and view direction vectors. The reason they
not normalized here is because sometimes precision can be lost when normalized
vectors pass from the vertex to the pixel shader. This is not something I can
comment on further sadly, it is merely something I have picked up as you are
now. We multiply the incoming normal vector by the world matrix to convert it
from model space to game world space.
We also calculate outgoing light and view
directions using the incoming light and eye positions and the earlier
calculated world position.
float4
PixelShaderFunction(VertexShaderOutput input) : COLOR0
{
//Calculate
local normalized normal vector
float4
Normal = float4(normalize(input.Normal), 1.0f);
//Calculate
local normalized view direction
float3
ViewDir = normalize(input.ViewDir);
//Calculate
local normalized light direction
float3
LightDir = normalize(input.LightDir);
//Calculate
the amount of diffuse light hitting this pixel
float
Diff = saturate(dot(Normal, -LightDir));
//Calculate
reflection vector of the light hitting this pixel
float4
Reflect = normalize(2 * Diff * Normal - float4(LightDir, 1.0f));
//Calculate
the amount of specular at this pixel
float4
Specular = pow(saturate(dot(Reflect, ViewDir)), 256);
//If
no light is hitting the pixel cut the specular power
if
(Diff <= 0.0f)
Specular
= 0.0f;
//Calculate
ambient light values
float4
AmbientColour = Light.ambientColour * Light.ambientIntensity;
//Calculate
diffuse light values
float4
DiffuseColour = Light.diffuseColour * Light.diffuseIntensity * Diff;
//Calculate
specular highlight colour
float4
SpecularColour = (Light.specularColour * Light.specularIntensity) * Specular;
return
AmbientColour + DiffuseColour + SpecularColour;
}
Now this is where the magic happens, firstly we need to
normalize those normal, view and light directional vectors. Next we need to know how much directional
light is hitting this pixel, we call this the light’s diffuse over the model
surface. We then calculate the reflecting vector of the light, as light hits a
surface one of the things that happens is that some of it is reflected back out
off the surface, we are calculating the angle at which this takes place for the
specular light.
Next we calculate the three light colours, using the
parameters from the Light struct created earlier. Note how the diffuse and specular
colours are being multiplied by the Diff and Specular powers, this gives them
the correct levels based on the surface’s exposure to the light and the angle
to the eye respectively.
Last but not least we add all three colours together to
produce the final colour value of the pixel. And the result?
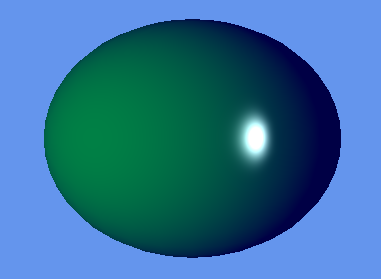
Here I used a dark blue ambient light, a green diffuse light
and a white specular light. The specular intensity has been ramped up to make
it obvious.
If you want to know more about the model space versus world
space conversions discussed in this tutorial and why they are important, checkout my quick tutorial explaining the difference between the two.
Please feel free to comment, I’m still new to all this
online blog/tutorials business so if you spot anything please let me know!
Cheers,
P D Flower.
No comments:
Post a Comment